Your Shopping Cart is empty.
View Cart (0 Items)
How to Draw a Bow and Arrow – Traditional to Modern
How to Draw a Bow and Arrow: A Guide
The most basic aspect of archery is the drawing of the bow. This article will explore the basics of how to draw a bow and arrow, as well as some details regarding variations of historical draws.
Variations of bow draws are almost as numerous as the different types of bows that existed throughout history. And, since archery and bow technology has evolved, new techniques and equipment became available. However, when discussing how to draw a bow and arrow, there are some common themes and basic principles that can be observed and summarized:
- Initial stance
- Initial positioning of the bow
- The hook
- The draw
- The release
- The follow-through
Anatomy of a Draw
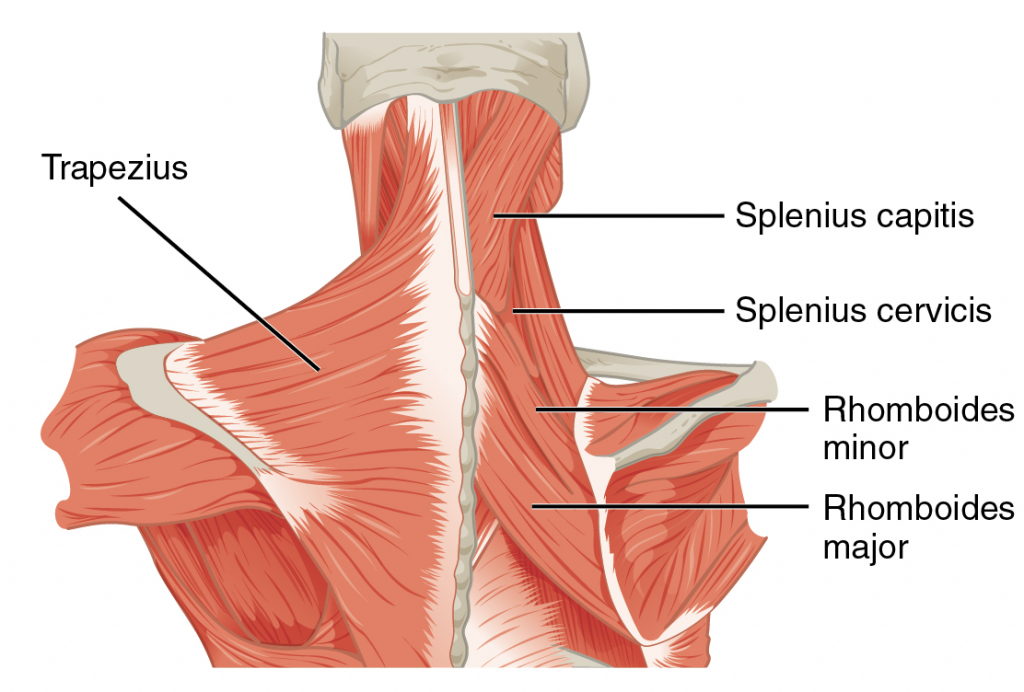
In order to draw a bow with optimal efficiency, it would be reasonable to first understand some basics in regard to human anatomy. Several muscles come into play when drawing a bow, however, the muscles of the back are of particular importance for drawing a bow.
The muscles of the back include the trapezius, rhomboids, and the latissimus dorsi. The trapezius and rhomboid muscles are responsible for pulling the shoulder blades together, which is a key movement when drawing a bow. The latissimus dorsi can also be active during a draw, depending on the technique being used. Building strong back muscles will drastically increase the archer’s ability to shoot heavier bows.
Back Tension in Archery
The term “back tension” is used extensively in archery when referring to drawing a bow. The rhomboid muscle group, when activated will retract the shoulder blades towards the spine. Simply put, back tension can be felt when pinching your shoulder blades together. You can try it right now!
Sit or stand nice and straight, looking dead ahead, and slowly and deliberately pinch your shoulder blades together. Pinch them together real nice and tight, as far as you can, now hold it there for a few seconds. There you go! You have just experienced back tension, the key to a solid bow draw. The importance of proper utilization of the back muscles becomes even more apparent as you use heavier bows. Remember back tension when thinking of how to draw a bow and arrow!
Below is a great video which explains aspects of the draw based on traditional Chinese archery:
The Basics
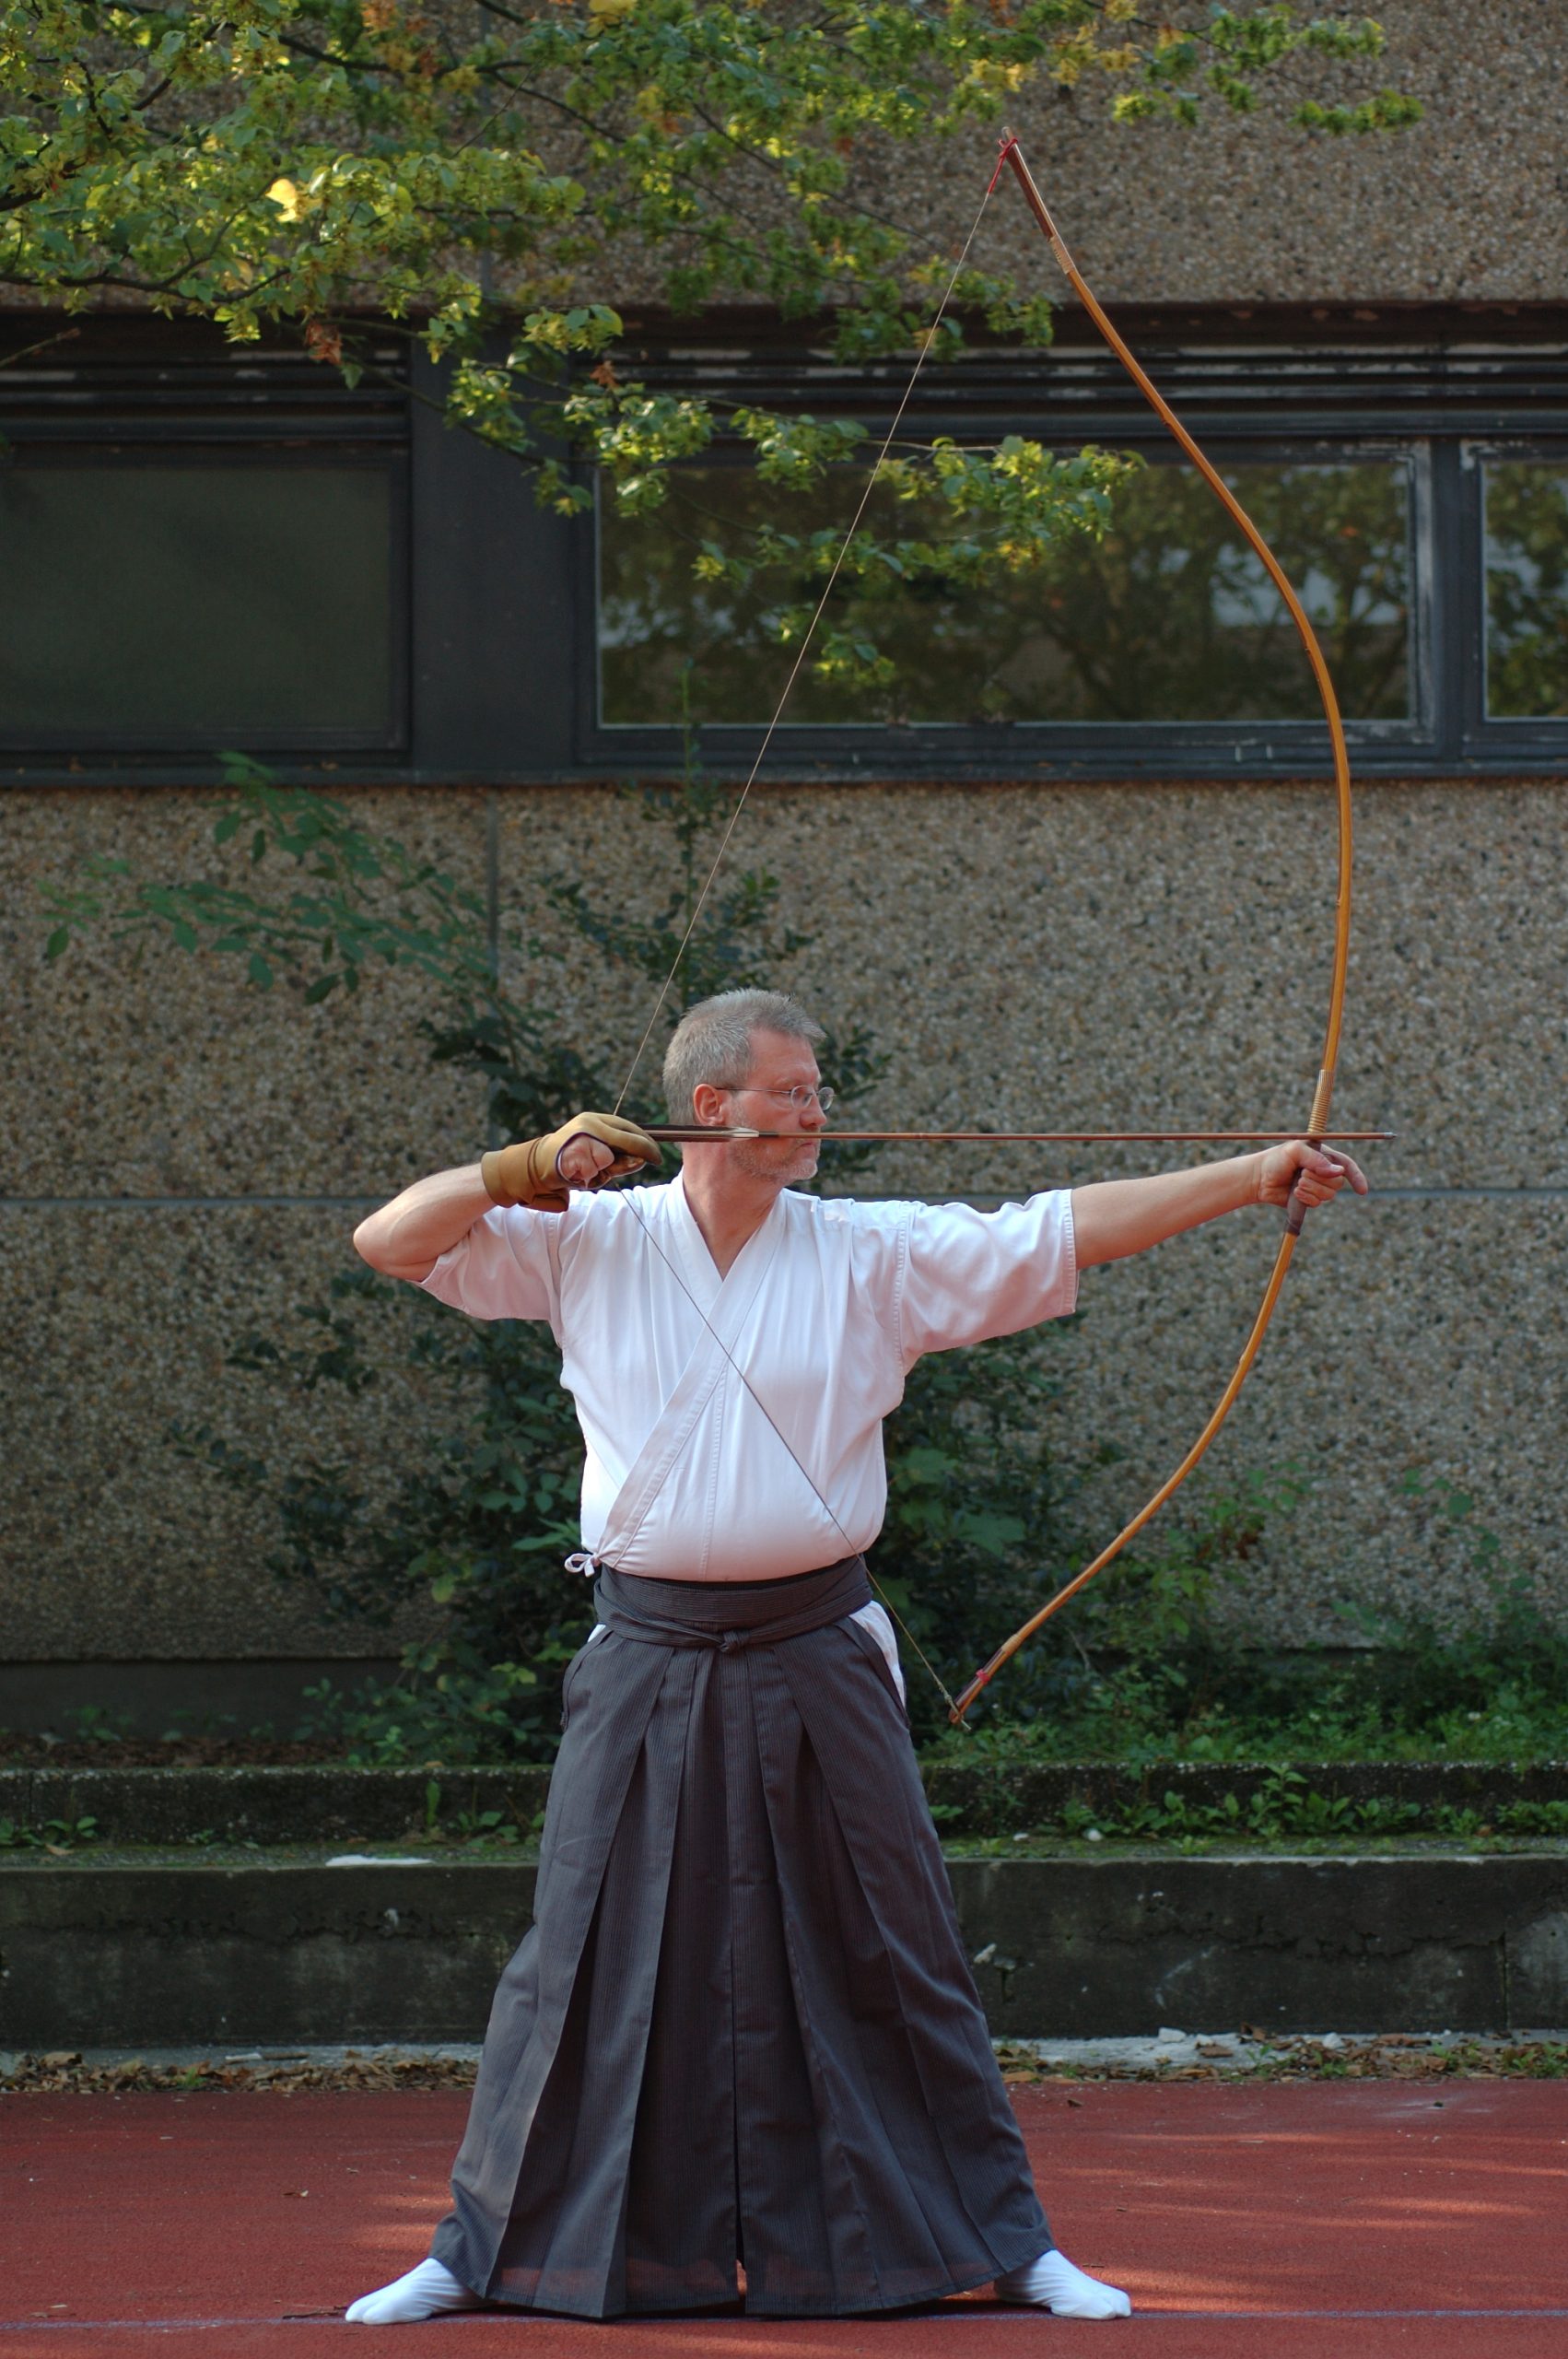
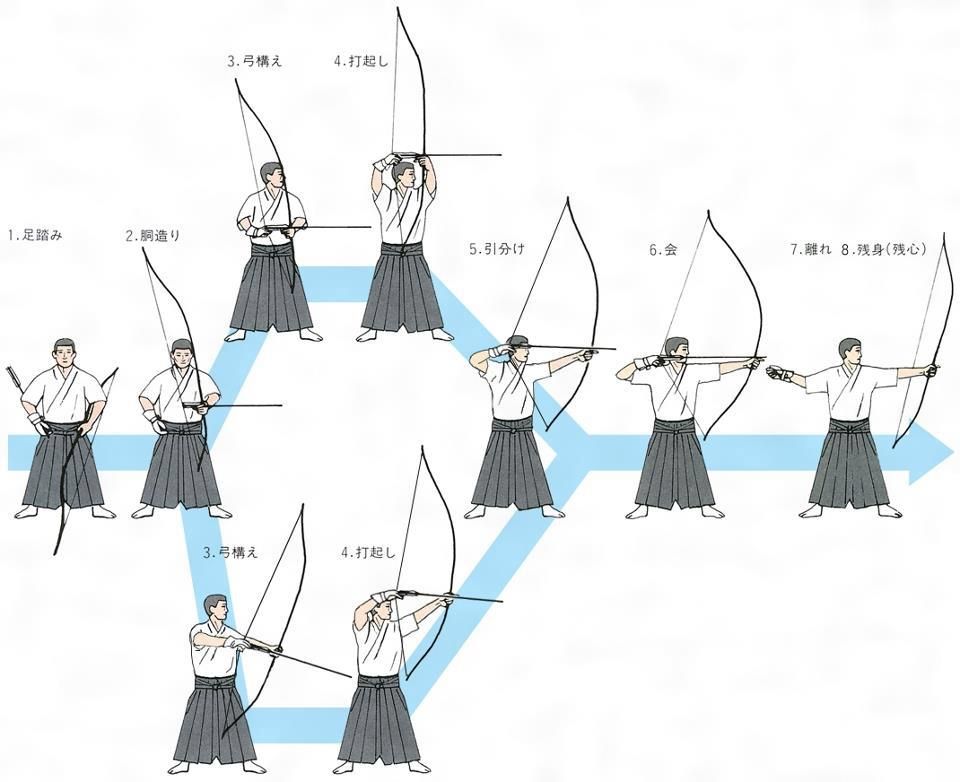
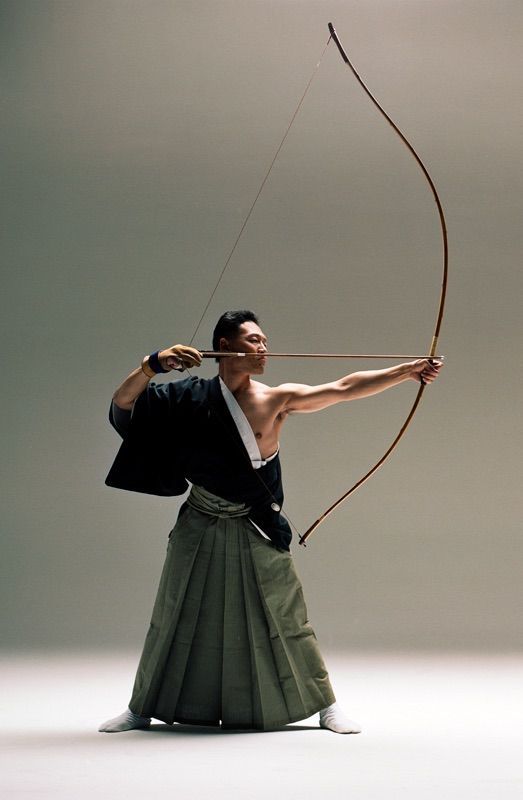
As previously mentioned, there are several variations of the draw that have been developed across the globe and throughout history. There are however some key similarities in the procedure, which we will discuss here. We will use the practice of traditional Japanese archery or kyudo to help break down the steps of a draw. Kyudo was chosen because of the deliberate, methodically ritualized procedure that the practice requires for proper shot execution. The methods are easily extrapolated to other types of bows or archery.
Initial Stance
The first step in drawing a bow is to align your body with the target. This begins with your stance. In kyudo this is known as ashibumi. The feet are placed perpendicular (at a right angle) to the target. They are also spaced apart so that the distance between your feet is your draw length.
Initial Positioning of the Bow
The bow is moved into an initial position from where the actual draw can commence. In kyudo, once the stance is established, the archer corrects his upper body (dozukuri), makes eye contact with the target, and prepares to make contact with the string with their draw hand.
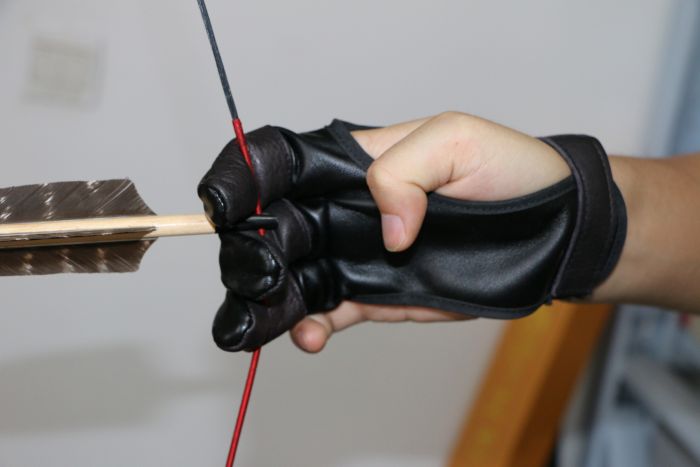
The Hook
The hook refers to the method by which the string is drawn back. Traditionally, this is accomplished with various fingers. Different release aids, such as gloves, tabs, and thumb rings were used to protect the digits. Modern release aids provide protection as well as a clean release. In kyudo, the hook is made in the action known as yugamae. While focused on the target, the draw hand is positioned on the string. Traditional Japanese archery utilizes thumb draw with a protective glove which covers the index and middle fingers as well as the thumb.
The Draw
Now the actual draw. The draw should be smooth and steady, allowing the muscles, especially of the back, to fully engage. You should focus on the pinching of the shoulder blades while expanding the chest.
The bow should be drawn to the same location in each shot you make. This location is what is referred to as the anchor point in archery terminology. Several different anchor points exist with different forms and styles of archery. You will have to experiment and see for yourself what works for you.
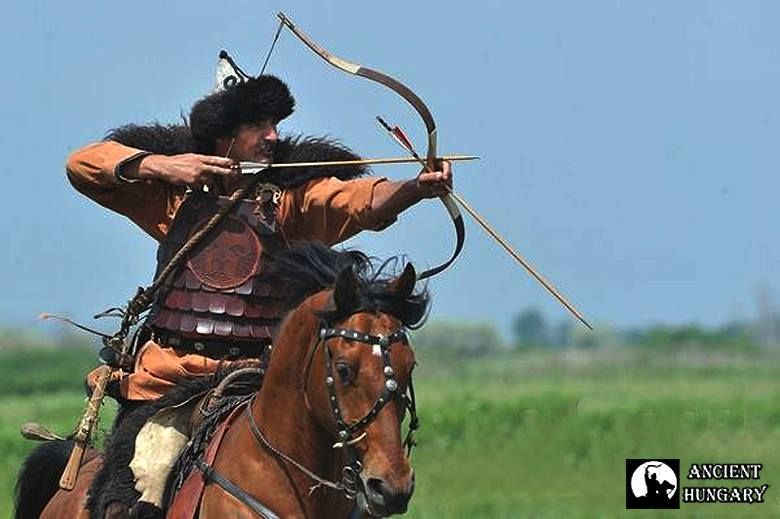
In traditional Korean archery, the anchor point is well behind the ear. Hungarian horseback archery Lajos Kassai has the anchor point to the center of the chest. Olympic archers, which modern recurve bows, usually have the anchor point so that the string is on the nose and the corner of the mouth, with the hand at the chin.
The drawing of the bow in kyudo is completed in the steps know as hikiwake and kai. The archer first pulls the bow arm forward, initiating the draw. The string hand then completes the draw. The anchor point in kyudo is also well behind the ear. The traditional Japanese bow or Yumi is over two meters long and has a relatively long draw. The archer then holds the draw in kai for a few seconds before the release.
The Release
Assuming the archer is engaged in target shooting, holding the bow steady for some time while you fully align yourself with the target seems like a good idea. On the other hand, some forms of instinctive archery practice a smooth draw and release, with no holding of the bow at full draw. It all depends on the application.
![]()
Throughout history, when archers engaged in battle, there may not have been much time to hold the bow at full draw for too long. However most archers these days are not needed in battles, so recreational target shooting is more widely practiced. Kyudo archers hold their shots at full draw for about 6 to 8 seconds before release. The archery treatise “Arab Archery” written by an unknown author around the year 1500 A.D. describes the draw and specifically the length of time the bow may be held at full draw:
Archers have disagreed concerning drawing. Some have maintained that an archer should draw the length of the arrow less the width of a fist and pause for a count of one or two, or, according to some, a count of three. He should then draw the remaining length of the arrow with a sudden jerk and release. Others draw steadily without any pause or holding. Among the followers of this second method some pause for a count of two while others pause for a count ranging between two and ten. These are the followers of the intermediary school.
1945, Princeton University Press, “Arab Archery, an Arabian Manuscript of about 1500 A.D.”
The Follow-Through
The follow-through completes the process, ties everything together, and sets the archer up for the next arrow. Once again, there are several follow-through techniques used in all the many and wonderful forms of archery. In kyudo, the follow-through portion of the draw in known as zanshin. The string hand after release is allowed to move back and the arm to straighten while an outward twist is given to the wrist of the bow hand. Focus on the target is maintained well after release.
In traditional Turkish archery, the bow swings forward and down with a flick of the archer’s wrist. This final twist and push of the bow hand (known as khatrah) were said to increase range and surely added some flair to the initial moments after release.
Historical Draws & Modern Draw
In this section on how to draw a bow and arrow, we will examine some draws and illustrate their execution.
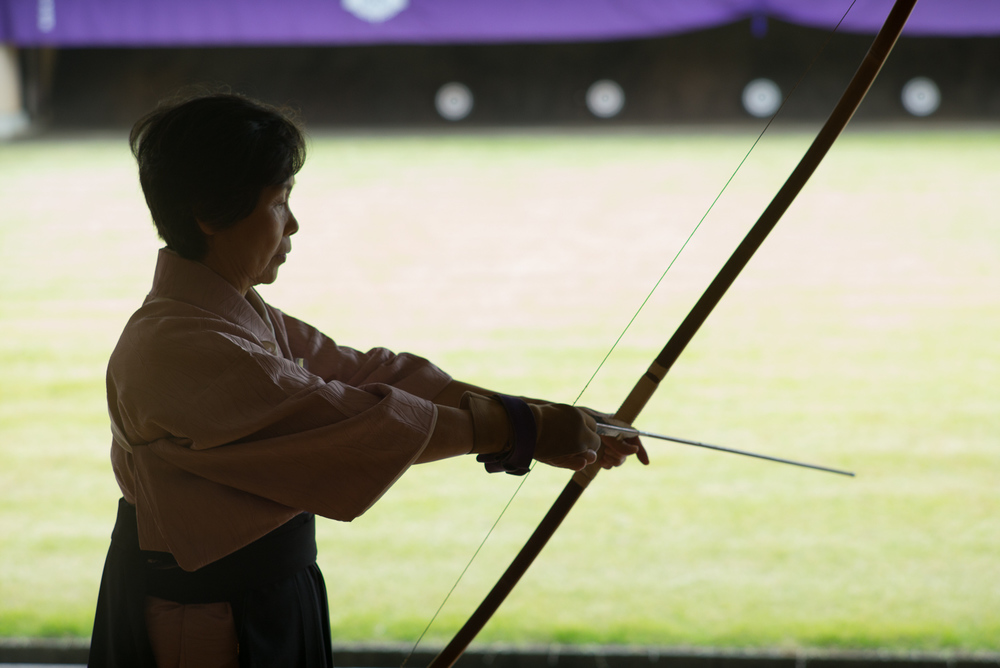
Mediterranean Draw
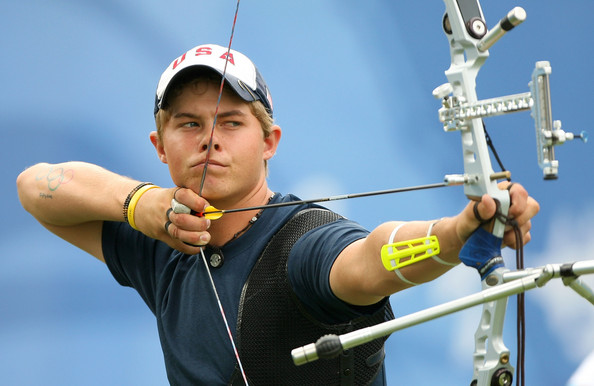
The Mediterranean draw is a very common draw. It is the draw utilized in Olympic archery with recurve bows. This draw utilizes three fingers, the index, middle, and ring. When the arrow is nocked, the index finger is above the arrow, while the middle and ring finger are beneath the arrow. This draw typically anchors somewhere around the mouth or jaw.
Hungarian Draw
A draw method quite similar to the Mediterranean came to be called the Hungarian draw. This draw utilizes only two fingers, the index, and middle finger. It has not become so popular as it is a weaker draw, due to the fact that only two fingers are active.
Thumb Draw
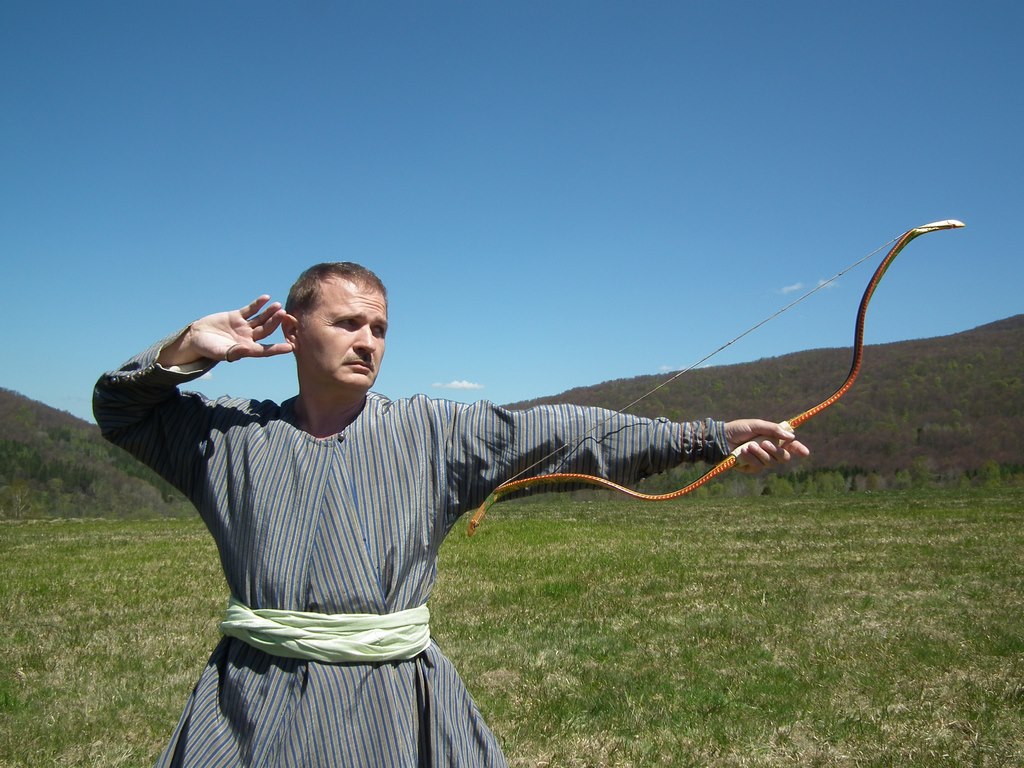
It could be argued that the thumb draw method has been used more than any other throughout history. It is the preferred method of hooking the bowstring in so many cultures throughout time and across the globe. Archery styles and groups of people from history that used the thumb draw include:
- Mongols (the thumb draw can also be referred to as the Mongolian draw)
- Traditional Turkish archery
- Traditional Chinese archery
- Japanese archery (kyudo)
- Traditional Korean archery
- The Mughal Empire
- Egyptian archery
- The Huns, Avars, and Magyar
- Assyrian Empire
Persian Draw
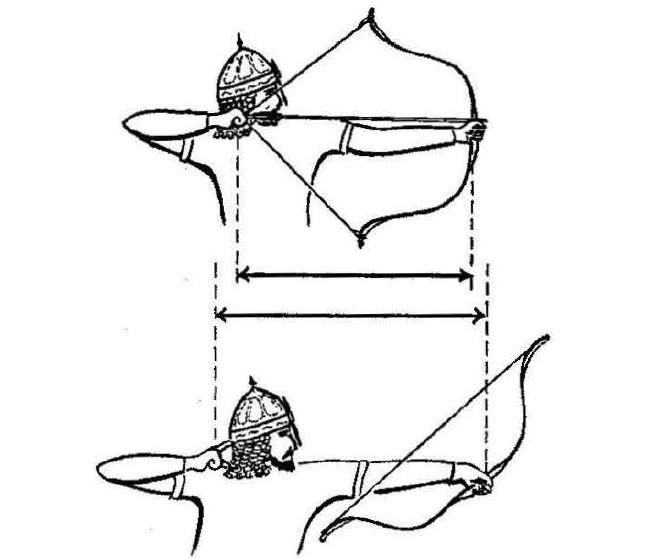
A peculiar and unique hood and draw method come to us from ancient Persia. There is some debate as to whether this draw was a mutation of the Western draw or the thumb draw. Some strong evidence does make the case for a thumb draw. In this method (thumb variant), the thumb hooks the string as in any other thumb draw, except it is the middle and ring fingers that engage the top of the thumb and lock it in place. The extended index finger rests on the arrow and the little finger is either neutral or pointing forwards.
How to Draw a Bow and Arrow with Draw/Release Aids
Modern recurve and compound bow archers utilize several release aids when drawing a bow. These modern, mechanized release aids ensure a very clean release. With the invention and of compound bows, which themselves utilize modern mechanical components, it was only a matter of time before mechanized release aids would become popular.
The most common release aids for compound bow archers are the wrist strap and handheld thumb release variants. The wrist strap release aid goes around the archers’ draw hand and a small set of mechanical jaws clamp around the string. Often the string is tied into a loop where the jaws are clamped. A small rod houses the clamps at the end and a trigger about halfway along its length. The index finger activates the trigger, which opens the small jaws, releasing the arrow.
A handheld variant also ensures a clean release. These release aids are designed to fit comfortably in the hand with ergonomic, machined grooves that hold the fingers in place and the whole hand steady. A small hook engages the string, which is mechanically linked to a small trigger or knob that may be engaged with the thumb. Both the wrist and handheld types are quite popular with compound bow archers.
Summary & Conclusions
We hope you enjoyed this article exploring some aspects of an important component in archery; the draw. There have been so many varieties and forms that archery has manifested throughout time and across the lands. Each is unique and yet they all share many fundamental qualities. No matter which forms you decide to pursue, they all require patience and practice to perform well. Now get out there and draw some bows.